Showing posts with label recipes. Show all posts

Monday, April 25, 2016

curry, basil and coconut for cupcakes.


If you're looking for a treat that is literally bursting with delicious, fresh and exotic flavors, that is definitely what you'll find in these cupcakes that combine the flavors of curry, coconut and fresh basil.


About a year ago now I had a curry cake with basil buttercream at my sister's wedding reception, it blew me away and I've been craving it ever since.
When I couldn't find any recipes online even CLOSELY resembling what I remember I decided to make my own, and added the coconut flavor because I think coconut and curry are just happy together.

These cupcakes have a sweet vanilla    base flavor with that curry combo of SUCH good spice flavors; turmeric, cinnamon, paprika, coriander, ginger, cloves, nutmeg, red pepper, black pepper and saffron. When that is combined with the sweetness of coconut and that fresh taste of basil in the buttercream with the crunch of toasted coconut, it really is a delightful and flavorful experience.


CURRY CUPCAKES (or cake)**:

1 cup butter, room temperature
1/2 cup vegetable shortening (may substitute more butter here if desired)
3 cups granulated sugar
5 eggs, room temperature
3 cups all purpose flour
2 tsp baking powder
1/4 tsp salt (kosher if you've got it)
5 tsp curry powder*
1/2 cup milk, room temperature
1/2 cup buttermilk, room temperature
2 tsp vanilla
1/2 tsp coconut flavoring

*I used The Spice Hunter: salt free curry blend
-I use my adapted vanilla cake recipe inspired by this recipe as my vanilla cake base and took off from there.

1. Preheat oven to 400. (my oven tends to run about 10 degrees cool so, set your temperatures and/or bake time accordingly) Line cupcake tin with cupcake liners.

2. Cream butter and shortening until very light and fluffy in your electric mixer, add sugar one cup at a time until fully mixed before adding the next cup.  Add eggs one by one until fully mixed before adding another egg.

3. Sift together flour, baking powder, salt and curry powder. Pour milks, vanilla and coconut flavoring into a mixing cup and whisk with a fork. Add both to the butter/shortening mix a bit at a time, starting and ending with the dry mixture.

4. Gently stir in mixer until well combined, and make sure to scrap down sides of mixer and mix thoroughly.

5. Evenly distribute batter (I used about 2 Tbsp per cupcake). These baked for 14 mins at 400 in my oven, be sure to check a couple minutes out to ensure you don't over bake, a toothpick should come out of the center clean.

6. Immediately move cupcakes from cupcake tray to cooling racks. Let fully cool (and I would also chill a bit) before frosting.

Yield: 36 cupcakes

I freeze mine until I'm ready to frost and serve. When they are completely cooled and chilled I wrap each individually in saran wrap and place in gallon-size freezer bags. I pull them out just in time to add the frosting and then refrigerate again. Be sure to pull them out of the fridge at least an hour before serving.

** To make as a cake you can make 4 8-inch rounds or 3 9-inch rounds. I always butter and flour my pans with a parchment round in the bottom of each pan.
Bake at 400 for 20-25 minutes, or until toothpick comes out clean. 
(Tip:I always set an early timer for my first time with a recipe, to make sure I don't accidentally over bake.)

Let stand for about 5 minutes in cake pans before removing and letting cool completely on cooling racks.
(I saran wrap and freeze my cakes before frosting as well, and I like to make them ahead of time so I don't have to do everything in one day.)

BASIL COCONUT BUTTERCREAM FROSTING:

1 cup unsalted butter, room temperature
1 tsp vanilla
5-6 cups powdered sugar (add until the consistency is as firm as you like it, I like it to keep it's form a bit so I can frost easily)
4 cups fresh basil, (rise and dry and LOOSELY pack to measure it out in cups)
7 Tbsp coconut milk, mix in the can well before using to blend
2 tsp coconut flavoring (start with one and add second if you like more coconut flavor)

1. After washing and drying, pulse basil leaves in food processor until well chopped. Add 1 cup powdered sugar for each cup basil to food processor bowl and pulse until basil sugar mixture is fully combined and resembles a loose paste. Set aside.

2. Mix butter and vanilla until butter is light and fluffy.

3. Gradually combine with powdered sugar, start with the basil sugar combo and then add the extra powdered sugar.  

4. Add the coconut milk a tablespoon at a time, and fully mix, add more powdered sugar or more coconut milk until it reaches your desired consistency.  

5. Pipe onto chilled cupcakes as desired.

TOASTED COCONUT:

3-6 Tbsp of coconut flakes

1. Spread out evenly and thinly in a dark non-stick pan and broil on high until golden brown and let FULLY COOL before adding to cupcakes.

*Monitor these, they get golden all of the sudden and will burn shortly after if you aren't careful.


Hope you enjoy them as much as I do!


Thursday, January 15, 2015

sloppy joe pizza: perhaps the easiest meal ever. (disclaimer: I don't like real sloppy joes...)

sloppy joe pizza really might be the easiest thing you'll ever make your family for dinner.
I got my original recipe from my Momma and tweaked it a bit for my family.


Ingredients:
1/2-1 pound ground turkey (depending on how thick you like the topping)
1 cup frozen corn (thawed)
1/4-1/2 cup shredded cheese (whatever type you like, we've generally used straight mozzarella but sometimes a mix) 
1/2 cup (to taste really) Sweet Baby Ray's BBQ sauce
1 precooked pizza crust or french bread loaf

Directions:
1. Brown ground turkey, salt and pepper to taste. I also add some fresh chopped sweet onion or onion flakes.
2. Mix thawed corn, turkey and BBQ sauce in a bowl.
(Do as much BBQ sauce as you prefer, I don't like it to be super thick, just enough to get the meat and corn sticking together.)
3a. pizza crust: Cover the pizza crust in the meat and corn combo and top with cheese, bake as directed for crust (or until crust is golden brown and cheese is melted)
3b. french bread: slice in half length-wise (like you would for a big sandwich), put the two halves on a cookie sheet and top each with the meat and corn combo and cheese, bake at 350 until cheese is melted and dish is warm through.
4. Cut and serve.


Thursday, September 18, 2014

pumpkin chocolate chip cookies: hello fall.

I've really been craving a bit of fall in my life ever since I got back from visiting my family in Utah. The weather was just getting gorgeous and I'll openly admit, I miss having a real fall living in Texas. It's kind of summer until the middle to the end of October and then the winter is, admitedly beautifully mild.

But there is no sweatshirt crispness in the air or beautiful splash of fall leaves during the fall months even though I live in a forest.
So I try and substitute other fall staples like gourds and sunflowers and pinecones all over my house and every dish I can think of with squash or pumpkin in it... and I pretend I could wear a sweatshirt.


When I needed to make a treat for a activity with the 14-15 year old girls I get to work with in my church congregation earlier this week, it gave me a perfect excuse to make my first pumpkin treat of the "season".

One of the easiest cookie recipes I know and completely delicious, this was the pumpkin cookie recipe I grew up with in my house.


INGREDIENTS:
1/2 c shortening
1 1/2 c granulated sugar
2 large eggs
1 c pumpkin filling
1 c nuts (optional: I never add the nuts, still a kid at heart when it comes to nuts in cookies)
1 c semi-sweet chocolate chips
1 tsp vanilla
3 c flour
1 tsp baking powder
1 tsp soda
1/2 tsp salt
1 tsp cinnamon
1/2 tsp nutmeg

DIRECTIONS:
1. Preheat oven to 375 (my oven is a bit cold so I did 380)
2. Combine sugar, eggs, shortening, pumpkin and vanilla, mix.
3. Add add all the dry ingredients but the flour and chips, mix.
4. Add flour gradually, mix.
5. Mix in chocolate chips.

I use parchment paper on my cookies sheets to cut out clean up.
Use a spoon to place dollops of the cookie dough on the cookie sheets.
Bake for 10-12 minutes or until a toothpick comes out of the center clean.
Let cool on a cooling rack.

Enjoy!


Wednesday, July 2, 2014

low-fat, creamy bean and chicken burritos.


I hope I don't need to put "fast and easy" in the titles of any meal recipes I post any more, because if they aren't I most likely won't be posting them. And I'm okay with that.

This is an adaptation of a meal I grew up having at home that's a bit healthier than the original.
It's delicious, it's a great leftover and it's generally a picky eater pleaser.

Ingredients:
1 can shredded chicken, drained (you can boil or bake your own chicken of course, then shred)
1 can beans, rinsed and drained (you can use pinto, black or red beans)
1/2 c. shredded mozzarella cheese (you can do more or less, I just eye-ball it)
1 can (10.5 oz.)low-fat, low-sodium cream of chicken soup
1 can diced green chili peppers, drained
1 cup low-fat (or fat free) sour cream
8 flour tortillas, mine are 7" (use wheat tortillas to be extra healthy)
Toppings:
2 c. shredded romaine lettuce
diced tomatoes, sour cream, hot sauce, salsa, pico or whatever toppings your family likes best.

Directions:
Combine soup, sour cream, and chili peppers.
Add 1 cup of  creamy mixture to shredded chicken and beans and mix.
In a sprayed (I use an olive oil spray) 8x8 or 6x12 dish (I used Pyrex) lay out the tortillas and divide the chicken mix evenly between them, roll them up burrito-style (they stay closed best with the openings on the bottom).
Spread remaining creamy mixture over the top of the burritos.


Top with cheese.


Cover with foil and bake at 350 for about 40 minutes, take the foil off for the last 10 minutes to ensure the cheese fully melts.


Top with shredded romaine lettuce and whatever toppings make your family happy. Serve!
We served it with fresh fruit and a bit of Sangria soda this last time, delicious!


Thursday, June 26, 2014

fresh strawberry pie: all in the family.

I don't know about y'all but we are trying to take full advantage of strawberry season at our house, Kevin and I love them and both of our boys are crazy about them too. They're too good not to be though, right?


A few weeks ago a took my first stab at making a favorite family recipe for fresh strawberry pie with the strawberries I had leftover from making strawberry jam.  Man, I wish strawberries were in season all year round.

You wouldn't know it, judging just by me, but I come from two families that are incredibly talented in the kitchen.  This particular recipe is found in one of my Dad's families' cookbooks, Tanner Tasties II. When I was a teenager my aunt took on the project of compiling a second edition of favorite family recipes from my Grandma Tanner and mostly my 13 aunts, though a few of my older cousins also contributed.  The Tanner family has a deep love for pies, that I didn't know I shared until I was looking up this recipe and Kevin starting making fun of me for saying EVERY pie recipe I came across looked good.

our beloved cookbook.

This recipe makes two full pies and while the original recipe calls for regular pie crusts, I did one regular and one oatmeal pie crust aka Kevin's favorite pie crust of all time. Since everyone tends to have a family or favorite traditional pie crust recipe (and since I used a frozen one...) I'll just share the recipe for the oatmeal crust here.

Fresh Strawberry Pie:  Athelia Sears Tanner, grandma
(can substitute fresh peaches for strawberries)

Ingredients:
2 baked pie shells (in my case only one)
3/4 c. sugar
2 T. cornstarch
1 1/2 c. water
1 small package strawberry jello or Danish Dessert (would use peach jello for peach pie)
2+ pounds fresh strawberries, whole or sliced (substitute fresh peaches for peach pie)
3 oz cream cheese (I substituted Neufchatel cheese here)
1/2 c. powdered sugar
3/4 t. vanilla
1/2 container Cool Whip or 1/2 c. whipping cream (I used whipping cream)

Mix and cook sugar, cornstarch and water until gently boiling.
Remove from heat and add jello or Danish dessert.
Stir until completely dissolved, LET COOL.
Pour over berries (or peaches).
Combine cream cheese, powdered sugar, vanilla and whipped cream (or Cool Whip) and mix until fluffy.
Place cream mixture in the bottom of the pie shells.
Pile glazed fruit high on the top. (This is where having more than 2 pounds of fruit comes in useful, especially if you slice your strawberries like I did. The strawberry filling barely came to the top of the crusts for me rather than piling up above it like it is technically supposed to.)
Chill and serve with or without whipped cream.


Easy Oatmeal Pie Crust: Susan Winder Tanner, aunt

Ingredients:
1 c. quick oats
1/2 c. brown sugar
1/3 c. melted margarine
1/2 c. chopped nuts* (I used pecans)
*Can leave nuts out, add 1/2 c. more oats if you do.

Mix all ingredients together and press into a pie pan or square cake pan. Chill to firm.


These pies were completely delicious, Kevin ate more than I will say in one sitting for breakfast one morning.....so take my advice, go make some pie.


Saturday, January 25, 2014

sautéed chicken, jalapeño and mushroom salad. (with some sugar, spice and everything nice…)


 We generally have a salad for at least one dinner a week, so we are always looking for ways to switch it up. This one was one of the best we’d made in a long time…delicious.

Salad Ingredients:
1/3 head romaine lettuce, chopped
feta cheese, crumbled on each serving, to taste
1-2 chicken breasts
1 jalapeño pepper, chopped
1 green onion, chopped
2-3 white mushrooms, thinly sliced
½ apple, chopped
¼ cup caramelized pecans:
¼ cup pecans, chopped
1 Tbsp. salted butter
½ cup brown sugar
poppy seed vinaigrette salad dressing (recipe here)


Whenever Kevin cooks it’s off the cuff so…I tried my hardest to get him to nail down what went into the chicken marinade for this salad.

Chicken Marinade Ingredients:
2-3 Tbsp. brown sugar
1-2 garlic cloves, minced
dash of salt
½ cup apple cider vinegar (or enough to cover chicken)
*for later:
1 Tbsp. olive oil
2 garlic cloves, minced


Directions:
1.Mix up marinade in a Ziploc bag and add chicken. (Mixture should cover chicken when laid flat on it’s side…add apple cider until it does.)
*let marinade at least an hour

2.Caramelize about ¼ cup chopped pecans. (make more or less depending on how much you like this sweet element…)
Put about 1 Tbsp salted butter and ½ cup brown sugar in a pan. Once they’ve begun melting and mixing, add the chopped pecans and stir until the nuts are golden brown. Let cool on parchment paper.

3. Chop apple, green onion, jalapeño (remove seeds), set aside.
4. Slice mushrooms, set aside. (wash or remove the top layer)
5. If you don’t keep a supply of this dressing in the fridge, (like I do) make it now.
6. Chop lettuce, set aside.

7. Thinly cut the chicken breasts and sauté in olive oil with freshly minced garlic until about half cooked then add the chopped jalapeño and sliced mushrooms.  Sauté until chicken is cooked through.

8. Fill bowls with lettuce and top with sautéed chicken, mushrooms and jalapeño, green onion, caramelized pecans, apples, feta cheese and dressing.

Enjoy!

Wednesday, January 8, 2014

old-fashioned shortbread cookies: great-grandma myrtle's recipe.


The beginning of December we had a little gathering at our house with some missionaries from our church and some friends to watch a Christmas fireside broadcast put on by the leaders of our church to issue in the holiday and give beautiful reminders of “the reason for the season”. 
We had a little hot chocolate bar with these cookies to munch on while we watched.


These shortbread cookies are flakey and melt-in-your-mouth delicious. And they make the perfect companions to a steaming mug of hot chocolate.
Like everything else I make, they are extremely easy.

(Be warned they are what my family calls “more-ish”…you’ll find yourself wanting more and more.)

*This recipe makes quite a large batch so I’d recommend halving it unless you plan on giving some away.

INGREDIENTS:
1 lb. salted butter (softened but not melted)
1 c. powdered sugar
4 c. flour

Directions:
Mix all ingredients together, I actually used a pastry cutter/blender and it worked like a dream.

Roll dough out on a silicone pastry mat or wax paper. Cut dough into squares and poke with a fork. (I didn’t poke mine and they didn’t bubble but better safe than sorry, right?)

Bake at 350 degrees for 8-10 minutes or until golden brown around the edges. Our first pan took quite a bit longer than 10 minutes.

Let cool on cooling racks and sprinkle with powdered sugar.

Enjoy!


Tuesday, November 5, 2013

baked acorn squash+orzo pasta=autumn heaven

Last year, when we were living near my sister, she'd often come to visit us and cook with Kevin. (the two of them are cooking enthusiasts, I'm an eating enthusiast...yep, my kitchen with the two of them is a pretty good place to be for a person like me.)


Well one day last autumn she shared a roommate's family recipe for a DELICIOUS and SIMPLE way to eat acorn squash. And now I'm sort of obsessed.
I decided to make it for us to eat before we headed out to take the boys trick-or-treating this year and it completely hit the spot.


 Ingredients:
1 acorn squash (per 2 people, this is generous depending on the size of the acorn squash but I like to have leftovers the next day)
1 cup uncooked Orzo pasta (again per 2 people)
butter
salt
pepper

*Preheat oven to 375 degrees.
*Cut the squash in half.
(this is BY FAR the hardest part, I had to have Kevin do it the night before and I Saran wrapped it and kept it in the fridge until I was ready for it...)
*Put about 1/4" of water in a 9x13 pan and place squash halves RIGHT side up in the pan. 
(use a bigger pan if you are cooking more and they won't fit)
*Poke the inside of the squash halves with a fork and put a little slice of butter into each squash half to keep it moist while baking.
*Place the pan in the oven and lightly cover with aluminum foil.
*Bake for 1.5 hours or until a fork glides through the squash.
(you want it to mash up without hardly any effort with a fork)

*Cook the pasta about 20 minutes before the squash is done.
(I just brought some unmeasured water to a boil and added the pasta, stirring occasionally until it was tender.)
*Drain all the water then butter, salt and pepper to taste.  

*Remove the baked squash from the outer shell with a spoon or mash it right in the shell and mix the pasta in. ENJOY!
(again add butter and salt and pepper to taste)


Wednesday, October 2, 2013

fast.food.at.home: veggie style (aka my new obsession)


I am always looking for a new recipe that can check off all my boxes; healthy, fast, delicious, cheap, simple...not always super easy to find, right?
(good rule of thumb: if I can make it, it's super simple)

Well, I found this one on allrecipes.com a while back and we can't stop using it as a "we have no time to make dinner tonight" fallback because it's so tasty and healthy.

We really changed almost everything you put in the recipe, this is how we've grown to love it;
*You can put in whatever veggies you have or are in season. (love it when you can do that)

Ingredients:
1/8 cup olive oil
1-3 cloves fresh garlic, minced (add more if you like a strong garlic taste like we do)
1 tsp salt
1 medium zucchini, chopped
1/2 sweet onion, chopped
1/2 cup mushrooms, sliced 
2 peppers, chopped (we like peppers with a little kick but Bell peppers would work just as well)
3-4 Tbsp. Balsamic vinegar
feta cheese, crumbled (we just sprinkle as much as we want in, it probably amounts to about 1/4 cup (unpacked))

Baguette, sliced and broiled
*Our grocery store has white, wheat, and mixed grain baguettes you can cook at home, so the bread is hot and fresh. If you use this kind, cook the bread while you're making the dish, butter or brush with oil and broil after it's cooked.

Instructions:
Saute the garlic in the olive oil in a large skillet. Add salt, chopped veggies and sliced mushrooms and cook until they are warm through and tender. Add Balsamic vinegar as the veggies cook.  Add feta cheese directly after taking it off the heat and mix throughout. 

Cut baguette in half horizontally and spread butter or brush olive oil on halves.
Broil under golden brown, cut pieces to your desired size.

We serve the veggies in bowls with the oil and vinegar sauce it cooked in so you can dip the baguette in it...SO good. Spoon onto your baguette slices and try not to devour it all at once, seriously... :)

Monday, September 23, 2013

white chili with chicken: crockpot style.

My sweet friend Kari (who is also an incredibly talented photographer, check out her work here.) made me this soup the day we brought Drew home from the hospital and I've been in love with it ever since. 
(Her friend, McKenzie Weber, made the same soup for her when she brought her third child, Bryn, home from the hospital and she had to get the recipe...I understand why:) )

Well now I'm sharing the recipe with all of you.  :)
I changed it just a bit to make it easier, healthier and so that I could cook it in a crock-pot instead of on the stove-top, since that is more conducive to my hectic schedule right now. 
I also double it when I make it because it makes such good leftovers.

White Chili with Chicken Recipe;

*For a lighter version substitute light sour cream and half and half, or omit cream and sour cream completely. I go the substitution route, can't fully let go of the creaminess, right? 

1 lb boneless, skinless chicken breast  (I use canned chicken, 1 12.5 oz can)
1 med sweet onion, chopped (I use a food processor)
1 tsp garlic powder (I use 2 fresh garlic cloves, minced)
1 Tbsp vegetable oil (I use olive oil)
2 (15.5 oz) cans Great Northern beans (any white beans work, I use whatever I have)
1 (14.5 oz) can chicken broth (this is about 2 cups if you make your own broth)
1 (4 oz) can chopped green chilies
1 tsp salt
1 tsp dried oregano
1 tsp ground cumin
1/2 tsp pepper
1/4 tsp cayenne pepper
1 c (8 oz) sour cream (I use light sour cream)
1 c whipping cream   (I use Half and Half)   

Cut chicken into 1/2 inch cubes. In a large frying pan, saute chicken*, onion, and garlic in oil until chicken is no longer pink. 
Put sauteed onion and garlic in crock-pot. Add chicken*, beans, broth, chilies and seasonings.  

 *If you use canned chicken you will wait to add it to the crock-pot until you add the beans, chilies and spices otherwise you saute with onion and garlic.

Choose the length of time you want for your crock-pot to cook. (I usually do the 4 hour setting) Whisk in the light sour cream and half and half 30 minutes before the cooking time is up. (So after 3.5 hours if you do 4 hours like me.)
 Top with fresh cilantro. (if desired)

This meal is so easy and ridiculously delicious, enjoy!


Friday, September 20, 2013

Black Bean and Quinoa Burgers.


I don't know about y'all but I really love beans, so the idea of a bean burger has always appealed to me. Being a healthy alternative to red meat was a plus too.

*As I've said before, though I love the taste of red meat, it's not really great friends with my stomach.


I used this recipe from allrecipes.com as a starting point for my first attempt at black bean burgers. My "burgers" were actually a combination of my favorite advice for changes I took from several different reviews of the original recipe.
(I would recommend trying some of the ideas at the bottom of this post on your first go-around to give your burgers a bit more flavor.)

So my recipe looked like this; (everything in red is a change I made to the original recipe.)

1/4 cup quinoa (cook this first and mix it in when smashing the beans)
(quinoa uses a 2:1 ratio like rice, so I used 1/2 cup water and 1/4 cup quinoa)
1 (16 ounce) can black beans, drained, rinsed and dried  
(I dried mine on paper towels, this  helps keep them from falling apart later.)
2 hatch chili peppers, cut into 2 inch pieces (these are our new favorite pepper of the South, you can use bell peppers as called for if you can't get them)
1/2 sweet onion, cut into wedges
3 cloves garlic, peeled
1 egg
1 tablespoon chili powder
1 tablespoon cumin (I thought that the cumin was a bit overpowering, so I'll use less and add different flavors next time.)
1 teaspoon chili sauce (I used Sriracha Chili Sauce)
1 cup bread crumbs (I used Panko)


Directions


  1. If grilling, preheat an outdoor grill for high heat, and lightly oil a sheet of aluminum foil. If baking, preheat oven to 375 degrees F (190 degrees C), and lightly oil a baking sheet.
  2. In a medium bowl, mash black beans with a fork until thick and pasty. Mix in cooked quinoa. (I mashed it a lot with a pastry blender.)
  3. In a food processor, finely chop bell pepper, onion, and garlic. Strain out the excess liquid in a fine strainer. (I pushed the mix against the strainer to get as much liquid as possible out.) Then stir into mashed beans.
    Just after adding the pepper, onion and garlic. My bowl sure makes the beans look like beef.
  4. In a small bowl, stir together egg, chili powder, cumin, and chili sauce. (I added a bit of salt too.)
  5. Stir the egg mixture into the mashed beans. Mix in bread crumbs until the mixture is sticky and holds together. Divide mixture into four patties.
  6. If grilling, place patties on foil, and grill about 8 minutes on each side. If baking, place patties on baking sheet, and bake about 10 minutes on each side.
*everything in black is from the original recipe from allrecipes.com which you can find here.

*I put the patties in the freezer until we actually cooked them to help them keep their form.

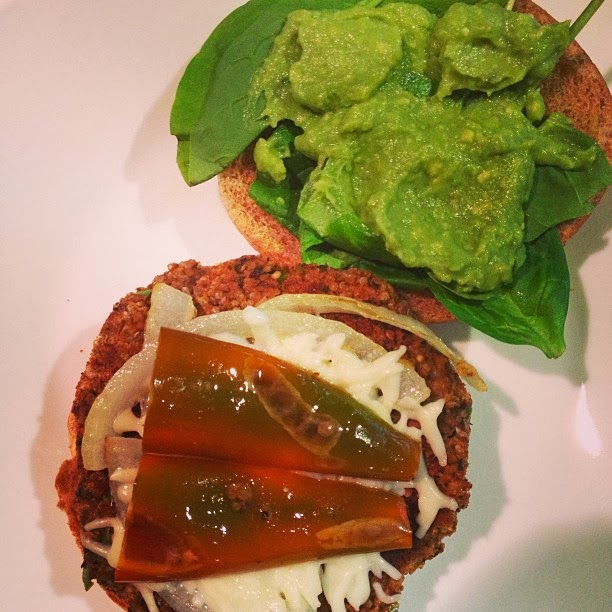
We grilled onion and pepper to put on our burgers, added a little mozzarella,  some fresh guacamole and we topped it all with spinach.

So, I think when eating vegetarian burgers it's important to not expect it to taste like a hamburger, because it doesn't.  Think of it as a bean dish and it'll be a lot more delicious to you.


Both Kevin and I agreed that we wanted the actual bean burger to be "bursting with flavor" a little more and I think our next ones will be.
We are really excited to try a "teriyaki-style" burger with sliced pineapple on top. We also want to do a "mexi-style" burger with taco seasonings with fresh pico and guacamole on top.

Happy Friday!


Monday, September 16, 2013

lunch lifesaver. best dressing in the world.

I'm always trying to find ways to keep it healthier in the food department at our house and having a salad most days for lunch has been really successful for me.

With my two boys under two...(okay, two boys under one and a half) quick meals are a necessity during the day. But I still like my food to taste delicious.  For all these reasons, this salad is my go-to lifesaver.


For me the key is an old family recipe for a poppy seed, oil and vinegar dressing;

2/3 cup sugar  
2/3 cup white vinegar
1 cup olive oil (original recipe calls for vegetable oil)
2 tsp salt
2 tsp dry mustard
2 tsp poppy seeds
1 diced green onion (optional)   

Romaine lettuce is the base (obviously) and then I go from there with what I have in the house.  
From there I had loads of topping go-tos;
red, black or pinto beans
bell peppers
red onion or green onion
doritos
mozzarella or feta cheese
crasins
cucumber
dried fruit

*When we have this type of salad for dinner we throw a chicken breast and some sweet onions and peppers on the grill to add in but I can't manage that during the day with the kiddos.

So so good. I know there are healthier ways to eat a salad, but for me, a salad is better than most other things I can whip together for lunch so it's worth it, at least for now. 

* Random Tidbit: I hated most vegetables up through my college years prior to serving as an LDS missionary. A love of anything veggie, is new and still developing for me.  So salads for lunch are a big deal, especially since I sincerely love them.  I love *most* vegetables now. So if you read this and think, "easy for you to do Michelle, I hate vegetables", no worries, I did too.  

Here's to a conscious effort to be a little better. (and delicious food)

Happy Monday y'all!


Wednesday, September 4, 2013

best.pasta.salad.ever

Back when we were getting ready to move from Utah to Texas my sweet cousin called and asked if she could bring dinner over to eat while we chatted and packed.   I said "yes", of course, and she ended up bringing a pasta salad that quickly became my very favorite. I've made it again so many times and thought it was too good not to share with y'all. 


We have done a little bit of a variation but I'll get to that; here's the original recipe;

Ingredients: 

1 lb. pasta, (your choice, I used multi-grain Rotini) cooked, drained, and cooled
2 cups fresh baby spinach, chopped
1 large cucumber, peeled, seeded, and diced
1 lb. cherry or grape tomatoes, cut in halves or quarters depending on size
2 green onions, thinly sliced
1/4 cup finely diced red onion
2 medium carrots, grated
1/2 cup (packed) fresh basil leaves, chopped
1 tsp. chopped fresh mint
1/2 lb. Feta cheese, cut into bite sized cubes
1/4 cup chopped Kalamata olives (optional)
Salt and freshly ground black pepper


Prep Time: 20 minutes
Cook Time: 11 minutes
Total Time: 31 minutes

Yield: 8 servings


Here is the dressing, that in my opinion, is what makes the salad;
(courtesy of Athelia Graham)
 
Ingredients: 
¼ cup sugar
1 tsp salt
 ¼ tsp pepper
3 Tbsp vinegar:
*this is the key: half white vinegar and half balsamic vinegar
¼ cup olive oil
¼ tsp dry mustard
¾ tsp grated onions(or fresh green onions)
¾ tsp poppy seeds

* I always double the dressing recipe so I have plenty if it needs a little boost for leftovers, and leftovers with this salad are AWESOME.

So, like I said we often do a variation on the original recipe based on what we have in the house and to save on cost.
Here is a favorite alternative list of ingredients to add to the pasta;

-sauteed sweet onions and Hatch chilli peppers, chopped 
(you could substitute bell peppers or something with a hint of spice for the Hatch peppers if you can't get them.)
*saute with a bit of olive oil and one minced clove of garlic
- chicken: 1 breast, grilled and chopped or one can, shredded

*We still added the cucumber, spinach, green onions, fresh basil, Feta and pepper.


Wednesday, March 6, 2013

fiber delight.

Like I mentioned earlier, I'm working on a more healthy lifestyle again, now that I'm out of the 24-hours-a-day nauseous period of this pregnancy.  Of course a huge part of a healthy lifestyle is healthy food. I've been meaning to make some bran muffins because they are delicious, healthy, easy, save forever, Kevin can take them to school, and I love them. 

This is a Tanner family favorite recipe. (found in Tanner Tasties I and Tanner Tasties II).  
(Attributed to Bobbie Graham and Terri Mitchell.)

Refrigerator Bran Muffins
Ingredients:
2 cups boiling water
2 cups All-Bran
1 cup oil
2 cups sugar OR 1 cup honey
1 quart buttermilk OR sour milk OR yogurt
4 eggs, beaten
5 cups whole-wheat flour
1 teaspoon salt
5 teaspoons baking soda
4 cups dry All-Bran
*optional: raisins, craisins, nuts, berries, coconut, etc...

Directions:
*Pour boiling water over 2 cups All-Bran. Cream oil and sugar (or honey) then add buttermilk, eggs, hot bran mixture, flour, salt and soda. Mix well.  Add 4 cups dry All-Bran and mix well again.

*Bake at 400 for about 20 minutes.
(*Add nuts, raisins, craisins, berries, coconut, etc.. just before baking.)
finished batter is a bit lumpy.

*Can store in a tightly covered container in refrigerator and use as desired/needed.
Left over batter after making 6 muffins.
Even though it saves for weeks, I probably still could have half-ed the recipe for our small family.
I just sprinkled coconut on top before I baked them.
One thing I love about this recipe is that you can make as many or few muffins as you need so they're always fresh. 
My cousin Ashley Anne and I would make this recipe frequently when we were roommates in college. They are really delightful straight out of the oven in the morning.
Just out of the oven.

Ready for breakfast for the next few days.
 Like I said, I love these bran muffins and they are so easy to make.  Win-win. :) Happy Wednesday!